
I was lying on the rolling table at the chiropractor when I got a phone call for a cake order. A Thomas the Tank Engine cake, none the less. This was my first attempt at something of this magnitude, and not having any resources in front of me as I lay there, I quoted the price MUCH too low for this one. I hate it when that happens. Oh, and they needed it in two days and it needed to feed 50 people. If this was all I did, then no problem! But, I have a day job, and have to schedule these things around my work schedule. Luckily, I had the next day off and it worked out, but normally I need to plan cakes of this magnitude at least a week in advance. Let's just say, it was a great learning experience.

 Given my time allotment, I would not have time to make all the fillings from scratch, so I picked up some vienna cream filling from my neighborhood cake store, Do It With Icing, and some frosting pride from Smart and Final (the only place that I've found so far that carries both frosting and pastry pride). After researching, I found a handful of cakes that gave me an idea of what I needed to do. I don't EVER copy someone else's design. I always make it my own. I soon realized that I was going to need fondant in primary colors, including red and also black-yikes. It is extremely difficult to get a true black or red when coloring frosting, so I had to buy the pre-colored stuff to get the look I was going for.
 The night before decorating, I baked the cake (vanilla and dark chocolate marble), which took FOUR batches and made the accessories for the cake out of fondant (so they would be dry before adding them to the cake). The structure of this cake was going to be tricky. You would almost need a degree in engineering (slight pun there) to build a cake like this. My dad was a civil engineer, so maybe it's in my blood? Anywho, I figured it out. I had to do a rectangular cake as the base and then cut round cakes in half, in different sizes, to use to shape the train. I used straws in the half-circle shapes to hold them together. Each layer was filled with a vanilla simple syrup, vienna cream and frosting pride. I left the "muffin top" on the front and back half circles, but all other layers were trimmed to the exact same size as the other.
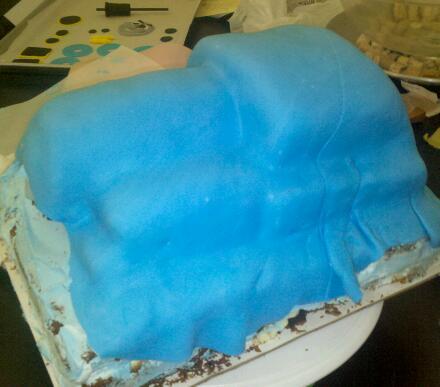 Oh, fondant. Why do you test me? I bought the "other brand" of fondant and not the brand I usually get, which was easier to mix color into, but more difficult to work with over all. It doesn't smooth out as well, let's just leave it at that. My issues this time, were seemingly huge creases in the fondant on the right side of the train that would just not smooth out. This is killing the perfectionist in me, so I had to decide to just let it go and try to cover it up with the train accessories. If you look closely, you'll see what I mean toward the back of the train. You'll notice, I didn't cover the entire train in the blue fondant. This is because I'm going to be adding different colors and features to the train, which will cover this off. Plus, let's face it, fondant is expensive and doesn't taste very good, so why add more than I have to? Plus, sometimes, I misjudge how much coverage I'm going to get out of the fondant and end up having to compromise.
The next step in this process is to start adding the features of the train. To say I had this all planned out perfectly from the beginning would be a lie. Things happen and your plans change and sometimes I don't know what I'm doing until right before I do it. But, usually it works out okay, usually.
 I finished it off by tracing the elements with black frosting (which I had to buy because black is just impossible) and I wasn't too happy with the consistency of the frosting, which made it very difficult to write with, but went with it. I used black decorettes for the "coal" (which I got at the cake store) and stuck them to the cake with the black frosting. The writing turned out a LOT sloppier than I'm comfortable with, but there was no going back at this point. Every element used for this cake is edible, with the exception of the straws I used to hold it together.
 I spent a total of about 6 hours creating this cake, 5 of those hours dedicated to decorating. This broke down to, after expenses, about $2 an hour for my labor. Like I said, learning experience. Never answer your phone when you're at the chiropractor.

No comments:
Post a Comment