Sunday, April 18, 2010


Thursday, April 15, 2010
The Making of a Thomas the Tank Engine Cake

I was lying on the rolling table at the chiropractor when I got a phone call for a cake order. A Thomas the Tank Engine cake, none the less. This was my first attempt at something of this magnitude, and not having any resources in front of me as I lay there, I quoted the price MUCH too low for this one. I hate it when that happens. Oh, and they needed it in two days and it needed to feed 50 people. If this was all I did, then no problem! But, I have a day job, and have to schedule these things around my work schedule. Luckily, I had the next day off and it worked out, but normally I need to plan cakes of this magnitude at least a week in advance. Let's just say, it was a great learning experience.

 Given my time allotment, I would not have time to make all the fillings from scratch, so I picked up some vienna cream filling from my neighborhood cake store, Do It With Icing, and some frosting pride from Smart and Final (the only place that I've found so far that carries both frosting and pastry pride). After researching, I found a handful of cakes that gave me an idea of what I needed to do. I don't EVER copy someone else's design. I always make it my own. I soon realized that I was going to need fondant in primary colors, including red and also black-yikes. It is extremely difficult to get a true black or red when coloring frosting, so I had to buy the pre-colored stuff to get the look I was going for.
 The night before decorating, I baked the cake (vanilla and dark chocolate marble), which took FOUR batches and made the accessories for the cake out of fondant (so they would be dry before adding them to the cake). The structure of this cake was going to be tricky. You would almost need a degree in engineering (slight pun there) to build a cake like this. My dad was a civil engineer, so maybe it's in my blood? Anywho, I figured it out. I had to do a rectangular cake as the base and then cut round cakes in half, in different sizes, to use to shape the train. I used straws in the half-circle shapes to hold them together. Each layer was filled with a vanilla simple syrup, vienna cream and frosting pride. I left the "muffin top" on the front and back half circles, but all other layers were trimmed to the exact same size as the other.
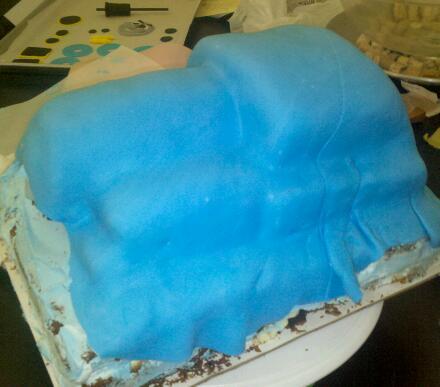 Oh, fondant. Why do you test me? I bought the "other brand" of fondant and not the brand I usually get, which was easier to mix color into, but more difficult to work with over all. It doesn't smooth out as well, let's just leave it at that. My issues this time, were seemingly huge creases in the fondant on the right side of the train that would just not smooth out. This is killing the perfectionist in me, so I had to decide to just let it go and try to cover it up with the train accessories. If you look closely, you'll see what I mean toward the back of the train. You'll notice, I didn't cover the entire train in the blue fondant. This is because I'm going to be adding different colors and features to the train, which will cover this off. Plus, let's face it, fondant is expensive and doesn't taste very good, so why add more than I have to? Plus, sometimes, I misjudge how much coverage I'm going to get out of the fondant and end up having to compromise.
The next step in this process is to start adding the features of the train. To say I had this all planned out perfectly from the beginning would be a lie. Things happen and your plans change and sometimes I don't know what I'm doing until right before I do it. But, usually it works out okay, usually.
 I finished it off by tracing the elements with black frosting (which I had to buy because black is just impossible) and I wasn't too happy with the consistency of the frosting, which made it very difficult to write with, but went with it. I used black decorettes for the "coal" (which I got at the cake store) and stuck them to the cake with the black frosting. The writing turned out a LOT sloppier than I'm comfortable with, but there was no going back at this point. Every element used for this cake is edible, with the exception of the straws I used to hold it together.
 I spent a total of about 6 hours creating this cake, 5 of those hours dedicated to decorating. This broke down to, after expenses, about $2 an hour for my labor. Like I said, learning experience. Never answer your phone when you're at the chiropractor.
Wednesday, April 14, 2010
Making a Strawberry Shortcake Character Cake
For her 5th birthday,
 my niece, Naomi, wanted a Strawberry Shortcake character cake. My normal research procedures when getting ideas for a cake would include "googling" for ideas and several shopping trips to Michael's, Party City and my neighborhood cake store, Do it With Icing. When the shopping trips turned out to be little or no help at all (neither Michael's or Party City had anything Strawberry Shortcake!). I checked out Sears, and they had quite a few Strawberry Shortcake toys and after a LOT of contemplating, I decided to go with a Strawberry Shortcake doll which I would stick into a "skirt" of cake. The idea was to make her sitting on a strawberry with her crossed legs sticking out from underneath her dress. I didn't really care for how the legs turned out, so I didn't use them and was pretty happy with how it turned out (for the most part). I'm such a perfectionist and I hate that I always see the flaws in my cakes when maybe I am the only one who notices them.
I personally think it is pointless to make a cake beautiful if the taste is mediocre. For this cake, I decided to go with a strawberry cream cheese mousse with whipped cream frosting (pastry pride) and organic strawberry syrup. Whenever I use fruit in my cakes, I attempt to use only organic fruit for many, many reasons, which I won't go into right now. I decided to do the cream cheese mousse since I was unable to use gelatin, like I normally do when I make my mousses, since it had to be kosher. (I try to avoid using eggs in mousses whenever possible. I have my many reasons for that too). Simply filling with the whipped icing will not support the weight of the cake and will "ooze" out. You don't want that. It makes life MUCH more difficult than it has to be.
A good rule of
 thumb when baking cakes is to bake the cake a day before you plan on putting it together. Bake, wrap entirely in plastic wrap and refrigerate overnight. This helps seal in the moisture and really makes a difference on how moist the cake will turn out. If you don't believe me, try it!
After the cakes have been baked and refrigerated, I cut off the "muffin top" so the layers will sit nicely on top of each other.
I then coated the cake with the organic strawberry syrup (it's easiest to use a squirt bottle) and layered with the strawberry mousse, fresh organic strawberries and whipped pastry pride (which is non-dairy and more stable than regular whipped cream).

For this cake, I made two 9" layers and two 8" layers. I repeated the process with the mousse, strawberries and whipped cream on each layer.
The next step is to carve the layers into the desired shape. I alternated vanilla and strawberry cake layers.

After the cake is carved, I covered it in the whipped cream. Typically, fondant cakes are covered in butter cream, which will "dry", and then either sprayed with water or covered in piping gel in order to get the fondant to stick to the cake. I prefer to use whipped cream icing (depending on the cake recipe) which is a LOT messier to work with and results a more rounded look on the cake edges. But in my opinion, it tastes a LOT better. And let's face it, if the cake doesn't taste amazing, all that effo
 rt to decorate it beautifully is wasted.
I have a love/hate relationship with fondant. I do prefer to use the Milton brand (available at Michael's). It just seems to be easier to work with and cracks less than the other types I've tried. After rolling out the fondant (pretty much exactly how you'd roll out sugar cookie dough), I carefully place it on the cake and smooth out with my fondant smoother. I used several different colors for this cake, including red, which is often difficult to get. I came pretty close.

The idea for this cake was to make it look like Strawberry Shortcake was sitting on the strawberry. Not sure if I pulled it off exactly, but that is what it's supposed to look like. I then added the rest of the decorations to my liking. The "5" is made out of edible pearls that are simply pressed into the strawberry made of fondant. Dots are stuck onto the fondant by brushing with a small amount of water. Too much water and it will drip a nice streak of whatever color the dot is, down the side of the cake, so less is more!
The cake is now
 ready for the doll to be inserted. I undressed her and w
 rapped her well in plastic wrap so she wouldn't get sticky and dirty. My brother actually asked me if I baked the cake with the doll inside of it (duh!). It would melt and probably poison the cake, so NO, I did not bake the doll in the cake. Her top is made of fondant, simply draped over her frame.
I later realized (after trying to fit the cake in the fridge) that I should have put the doll in later on, since I had to remove a shelf in order to fit her in my fridge! Luckily, my fridge was not too full this time and I could make her fit.
This cake required 3 hours and 15 minutes of decorating time. Baking the cake layers and the making of the fillings takes about 2 hours. Total creating time, about 5 hours.

About the Chef
 Courtney Jones, CC
This is my first attempt at a blog, ever, so hopefully I won't screw it up too badly. I basically needed a way to document the cakes and other baked goodies I make for my business (Miss Jones Catering and Cakes) so, here goes!
A little about me: By day, I work as a store manager. Looking for a creative outlet, I took 3 years out of my life and went to culinary school (while still working 50+ hours a week, of course). Now, here I am, juggling the day job and baking like a mad-woman often times.
I get asked A LOT where I learned to work with fondant and create these cakes like I do and it is often assumed that I learned my craft in culinary school. I did learn a TON in culinary school but we never once did work with fondant. YouTube has been a great resource for me, as far as "how to", "tips" and even some "cake ideas." So basically, I learned how to make cakes off of YouTube and lots of patience, trials and errors. There is a YouTube video for just about everything! My friends and neighbors are often the recipients of my little "experiments" in the kitchen.

If you have any comments or suggestions, I would greatly appreciate them. Plus, I really hope you enjoy reading about the baked goodies as much as I enjoy making them!
Subscribe to:
Posts (Atom)
